
Dreamy Homemade Ice Cream Cake Recipe for Sweet Celebrations
Crafting a delectable ice cream cake brings pure joy to any celebration.
Layers of creamy, cold goodness merge with soft, tender cake in a delightful dance of flavors.
Sweet memories flood back with each delicious slice you’ll create.
Homemade desserts always feel more special than store-bought treats.
Rich chocolate or classic vanilla provide perfect foundation for your masterpiece.
Summer gatherings or intimate family moments become magical with this crowd-pleasing dessert.
Let’s whip up something extraordinary that will have everyone asking for seconds.
Ice Cream Cake Is a Crowd-Pleaser for Parties
Ice Cream Cake: Must-Have Ingredients for Success
For the Cake Base:For the Filling and Frosting:For the Decorations and Extras:Stepwise Instructions for a Great Ice Cream Cake

Step 1: Prepare Cake Base
Grab your favorite cake mix and bake two round cake layers following the package directions. Allow the cakes to cool down completely until they reach room temperature.
Step 2: Set Up Freezing Station
Carefully line one cake pan with plastic wrap, ensuring it covers the entire bottom and sides of the pan. Gently place the first cake layer inside the prepared pan.
Step 3: Create Ice Cream Layer
Take softened ice cream and spread it smoothly across the first cake layer. Use a spatula to create an even, thick coating that covers the entire surface.
Step 4: Stack Cake Layers
Carefully position the second cake layer directly on top of the ice cream, creating a delicious sandwich-like structure.
Step 5: Initial Freezing Process
Transfer the cake to the freezer and let it set for at least 4 hours.
This helps the ice cream become solid and maintains the cake’s shape.
Step 6: Frost and Decorate
Remove the cake from the freezer and carefully unmold from the pan.
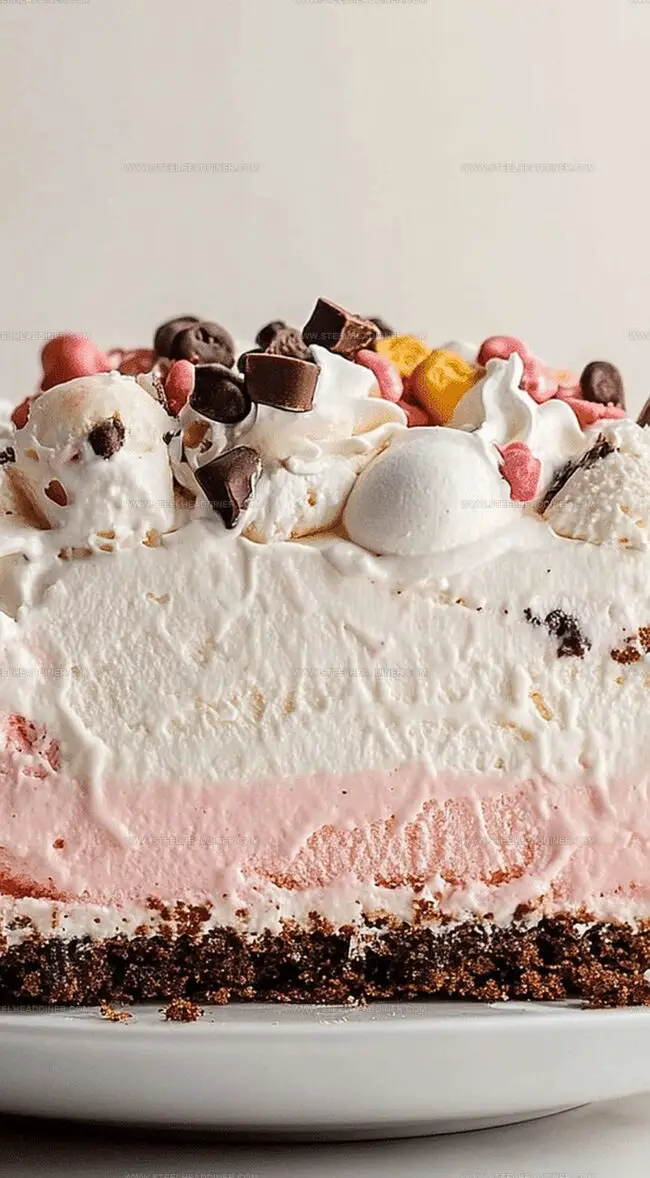
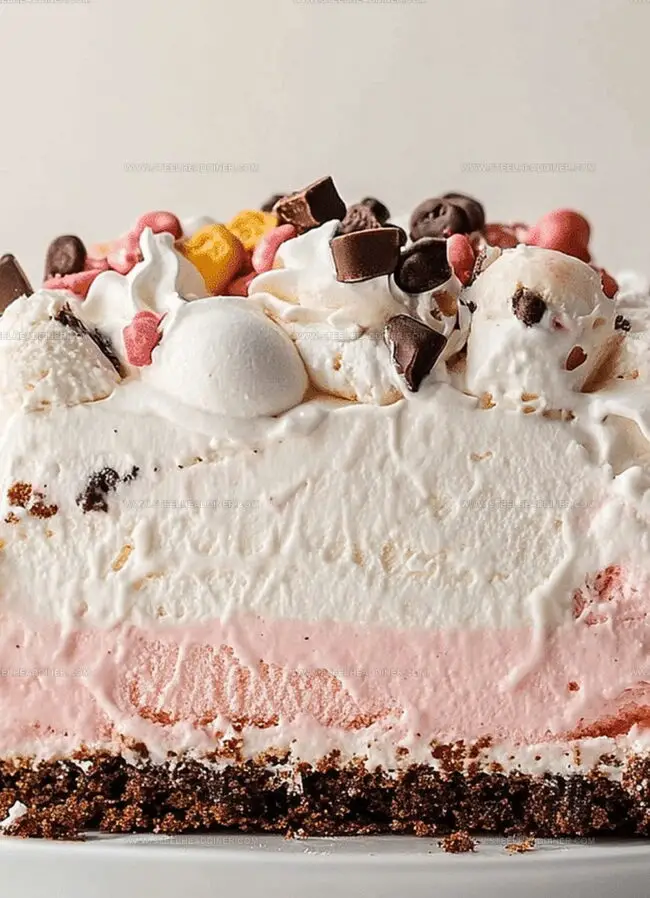
Cover the entire cake with fluffy whipped topping. Add fun decorations like:Step 7: Final Chill
Return the decorated cake to the freezer for an additional 1-2 hours to ensure everything sets perfectly.
This will help the frosting and decorations stay in place.
Step 8: Serve and Enjoy
Pull the cake out of the freezer about 10 minutes before serving to allow it to soften slightly.
Slice and serve this delightful frozen treat to your excited guests.
Expert Notes for Ice Cream Cake Perfection
Fun Variations to Try for Ice Cream Cake
Ice Cream Cake for Summer Celebrations
Summer Dessert Delights:Best Storage Tips for Ice Cream Cake Bliss
FAQs
Yes, absolutely! Use your favorite cake recipe and ensure it’s completely cooled before assembling the ice cream cake.
Select a firm, good-quality ice cream that won’t melt too quickly. Flavors like vanilla, chocolate, or strawberry are classic choices that work well.
You can prepare the cake up to 3-4 days before serving. Keep it well-covered in the freezer to maintain its texture and prevent freezer burn.
No special equipment is required. Just use standard round cake pans, plastic wrap, and a freezer. A spatula helps smooth the ice cream layer evenly.
Print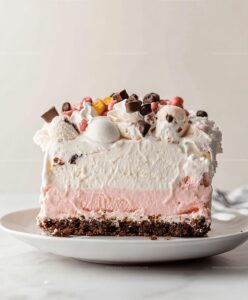
Ice Cream Cake Recipe
- Total Time: 8 hours
- Yield: 12 1x
Description
Homemade chocolate ice cream cake delights dessert enthusiasts with layers of rich chocolate and creamy vanilla. Chocolate lovers will savor each cool, indulgent slice that combines classic cake and smooth ice cream textures.
Ingredients
- 2 quarts ice cream (softened, any flavor)
- 1 box cake mix (any flavor)
- 1 container whipped topping (Cool Whip or homemade)
- Sprinkles (optional)
- Chocolate syrup (optional)
- Candy toppings (optional)
Instructions
- Prepare cake layers according to package directions using two round pans, ensuring even baking at recommended temperature.
- Allow cake layers to cool completely at room temperature, which prevents ice cream from melting during assembly.
- Line one cake pan with plastic wrap, creating a smooth surface for easy cake removal later.
- Place first cake layer inside the plastic-lined pan as the foundation of the frozen dessert.
- Soften ice cream at room temperature for 5-10 minutes to achieve spreadable consistency.
- Carefully spread softened ice cream over the first cake layer, creating an even and thick coating.
- Gently position the second cake layer directly on top of the ice cream layer, pressing lightly to secure.
- Transfer the assembled cake to the freezer and chill for 4-5 hours until completely firm and set.
- Remove cake from freezer and carefully lift out of the pan using plastic wrap edges.
- Cover entire cake with whipped topping, ensuring smooth and even coverage.
- Embellish with desired decorations like colorful sprinkles, drizzled chocolate syrup, or crushed candy.
- Return decorated cake to freezer for additional 1-2 hours to stabilize frosting and maintain shape.
- Before serving, let cake rest at room temperature for 5-10 minutes to soften slightly for easier slicing.
Notes
- Prevent cake crumbling by ensuring it’s completely cooled before adding ice cream layer.
- Select high-quality, slow-melting ice cream to maintain structural integrity during assembly.
- Use parchment paper in addition to plastic wrap for easier cake removal and cleaner edges.
- Try complementary cake and ice cream flavor combinations like chocolate cake with mint chip or vanilla cake with strawberry ice cream for unique taste experiences.
- Prep Time: 8 hours
- Cook Time: 0 minutes
- Category: Desserts
- Method: Baking
- Cuisine: American
Nutrition
- Serving Size: 12
- Calories: 350 kcal
- Sugar: 30 g
- Sodium: 220 mg
- Fat: 15 g
- Saturated Fat: 9 g
- Unsaturated Fat: 5 g
- Trans Fat: 0.5 g
- Carbohydrates: 45 g
- Fiber: 1.5 g
- Protein: 4 g
- Cholesterol: 40 mg
Jack Monroe
Founder & Recipe Innovator
Expertise
Pacific Northwest cuisine, Single-serving recipe development, Sustainable sourcing and cooking, Modern comfort food
Education
Brightwater
Associate of Applied Science in Culinary Arts
Focus: Sustainable cooking, seasonal ingredients, and food systems education
Jack grew up with a fishing rod in one hand and a cast-iron skillet in the other. After graduating from Brightwater: A Center for the Study of Food, he set out to prove that cooking for one could still taste like a feast.
Jack believes that food should feel real: fresh, fearless, and a little wild, just like the rivers he grew up around. For Jack, every single dish is a small adventure, and the best ones are the ones you can cook with heart, not hassle.