Grandma’s Golden Clothespin Cookies Recipe: A Sweet Family Treat
Sweet memories dance through kitchens when you whip up these delightful clothespin cookies that remind us of cherished family traditions.
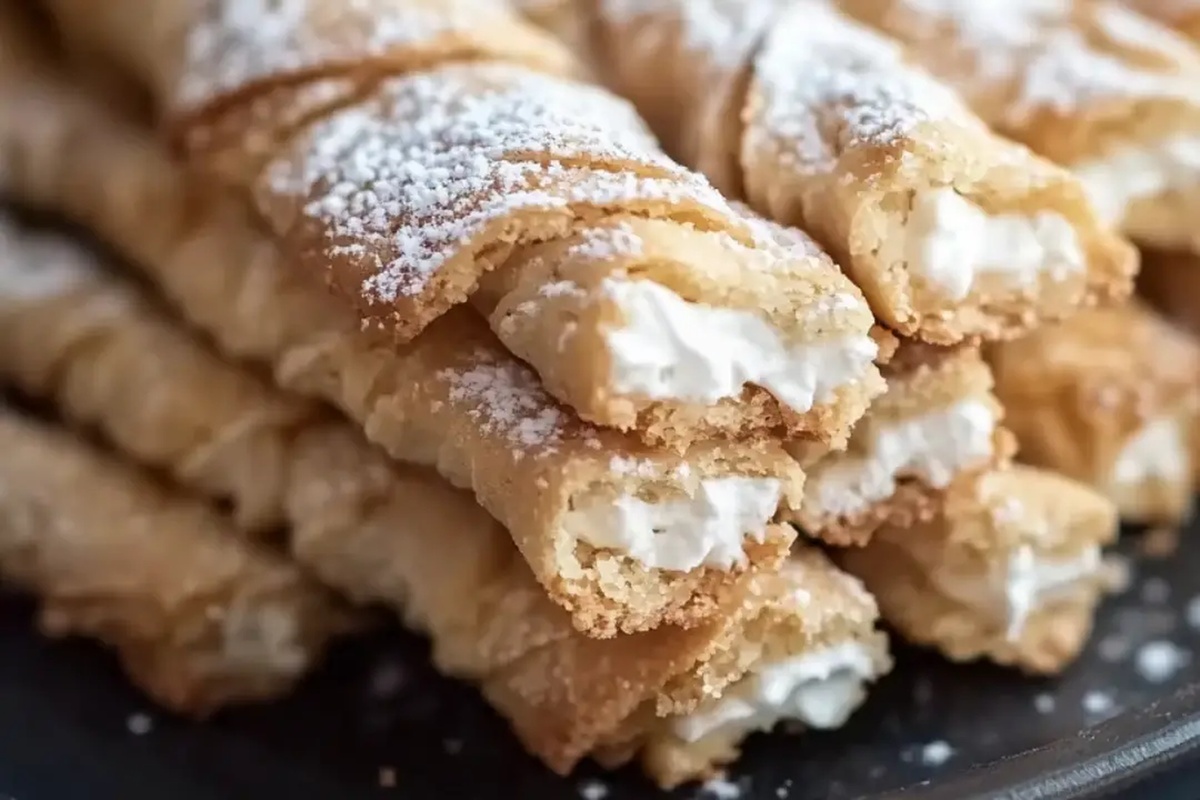
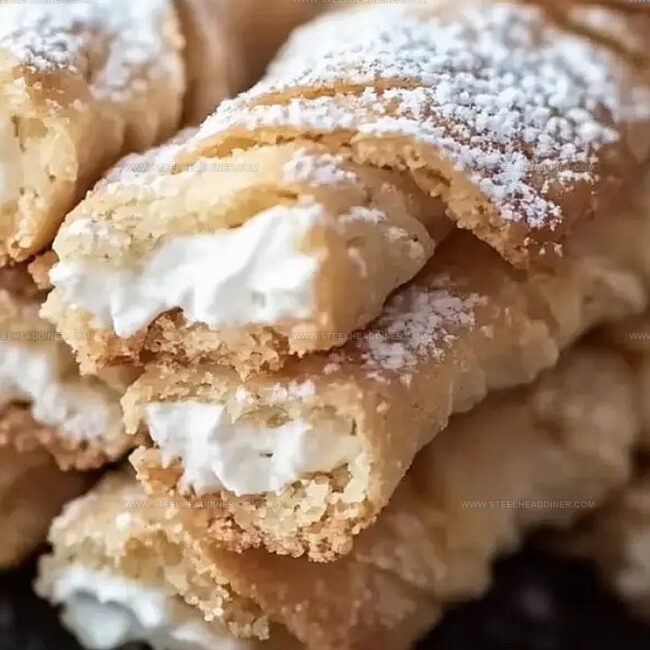
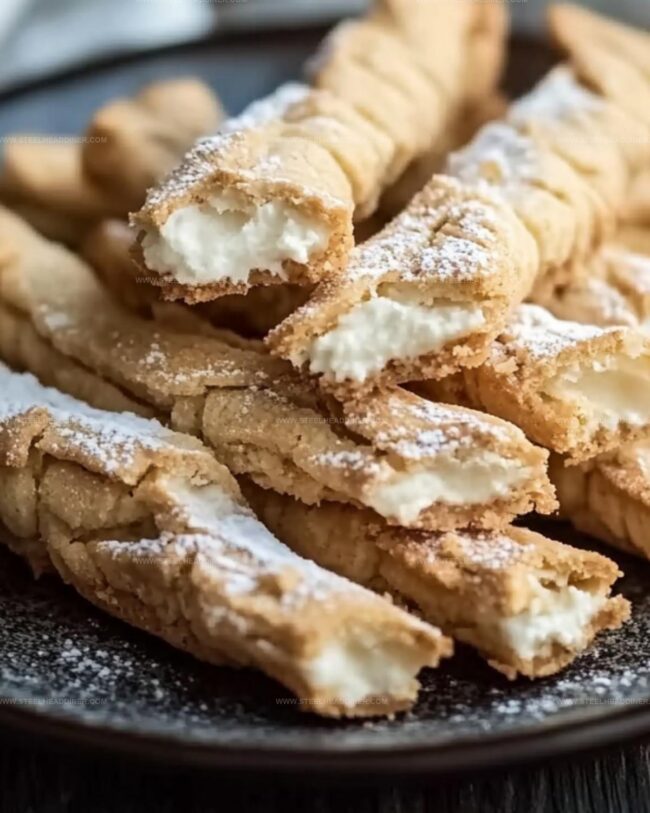
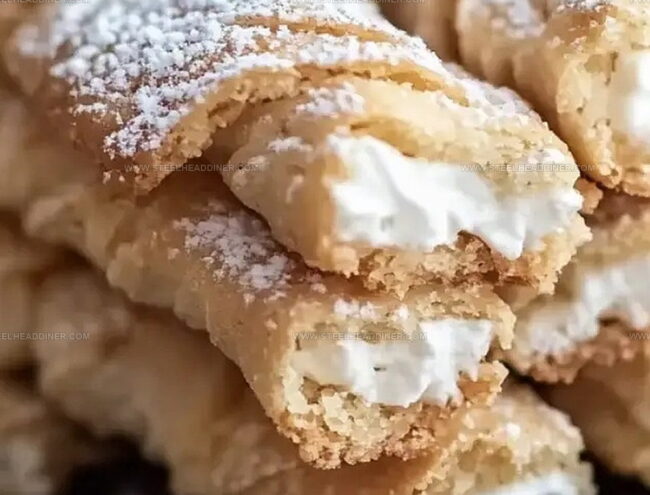
Crisp and delicate, these pastries wrap around metal clothespins during baking, creating a stunning spiral shape.
Generations of bakers have perfected this delicate technique, passing down the secret to creating these elegant treats.
Powdered sugar dusts each cookie, giving them a soft, cloud-like appearance that melts in your mouth.
The buttery dough transforms into golden, crisp spirals that crack gently with each bite.
Rich vanilla and subtle sweetness make these cookies a perfect companion to afternoon coffee or tea.
Bake a batch and watch as smiles spread across faces, one delectable bite at a time.
Why Clothespin Cookies Are So Good
Ingredients For Clothespin Cookies
Main Ingredients:Moisture and Binding Ingredients:Filling Ingredients:Preparation Ingredients:Step-By-Step Clothespin Cookie Instructions
Step 1: Prepare Cookie Dough
Combine the following ingredients in a food processor:Pulse the ingredients until they form a cohesive mixture.
Step 2: Form Dough Ball
Add water to the mixture and pulse until the dough comes together into a compact ball.
Step 3: Shape and Chill Dough
Transfer the dough to a floured surface and gently press it together until it feels lightly tacky. Divide the dough into two equal portions and wrap each in plastic wrap.
Refrigerate for 1-2 hours to firm up.
Step 4: Prepare Baking Setup
Preheat the oven to 375°F.
Wrap clothespins completely in small aluminum foil sheets to protect them during baking.
Step 5: Roll and Cut Dough
Remove one dough half from the refrigerator.
Roll it out on a floured surface into a thin rectangle. Trim the edges and cut the dough into slender strips.
Step 6: Wrap Dough on Clothespins
Carefully wrap each dough strip around a foil-covered clothespin, ensuring a slight overlap. Position the wrapped clothespins on a parchment-lined baking sheet with ends facing downward.
Repeat with the remaining dough.
Step 7: Bake Cookie Shells
Bake the clothespin-wrapped dough for 18-20 minutes until they achieve a light golden brown color.
Step 8: Cool Cookie Shells
Allow the cookies to cool for 2-3 minutes. Gently remove the clothespins and transfer cookies to a wire rack to cool completely.
Step 9: Create Creamy Filling
In a pan, combine:Cook over medium heat, whisking continuously until the mixture thickens (approximately 10 minutes).
Step 10: Chill Filling Base
Transfer the thickened mixture to a heatproof bowl.
Cover with plastic wrap, ensuring direct contact with the surface to prevent skin formation. Refrigerate for 40 minutes.
Step 11: Whip Butter Base
Using a stand mixer with a whisk attachment, whip room temperature butter for 8 minutes until light and fluffy.
Step 12: Incorporate Filling
Gradually add the chilled flour mixture to the whipped butter, one scoop at a time, until fully incorporated.
Step 13: Finish Filling
Switch to the paddle attachment. Add vanilla and salt.
Beat on medium-high speed for 10-13 minutes until smooth and fluffy.
Step 14: Fill Cookie Shells
Use a piping bag fitted with a star tip to fill the cooled cookie shells with the creamy butter filling.
Helpful Tips For Clothespin Cookies
Creative Spins On Clothespin Cookies
Best Pairings For Clothespin Cookies
How To Store Clothespin Cookies Properly
FAQs
These are traditional pastries shaped by wrapping dough around clothespins, creating a hollow tube-like cookie that’s later filled with a creamy buttercream filling.
Yes, you’ll need clothespins wrapped in foil and a food processor. A stand mixer is helpful for the filling, but hand mixers can work too.
Wrapping clothespins in foil prevents the wood from burning during baking and ensures the cookies can be easily removed after cooling.
While it looks complex, the recipe is manageable for intermediate bakers who are comfortable with pastry dough and have patience for the chilling and shaping steps.
Print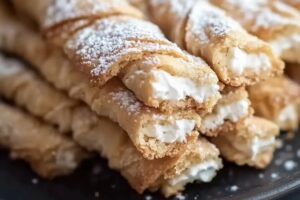
Clothespin Cookies Recipe
- Total Time: 3 hours 40 minutes
- Yield: 1 1x
Description
Delightful clothespin cookies dance with Italian heritage, offering a nostalgic sweet treat that whispers memories of traditional bakeries. Crisp pastry shells wrapped around delicate cream filling invite you to savor each delectable bite of this cherished family recipe.
Ingredients
Main Ingredients:
- 1 1/4 cups (150 grams) all-purpose flour
- 1/2 cup (113 grams) unsalted butter, chilled
- 1 egg yolk
Binding Ingredients:
- 2 teaspoons granulated sugar
- 1 dash salt
Liquid Ingredient:
- 5 tablespoons (75 milliliters) water
Instructions
- Combine butter, sugar, egg yolk, flour, and salt in a food processor. Pulse until the mixture forms a cohesive texture.
- Introduce water and pulse until the dough consolidates into a compact ball.
- Transfer dough to a flour-dusted surface, gently pressing to achieve a lightly tacky consistency.
- Segment the dough into two equal portions, encase in plastic wrap, and refrigerate for 1-2 hours.
- Heat oven to 375°F. Completely cover clothespins with aluminum foil sheets.
- On a floured surface, roll out one dough portion into a thin rectangular shape, trimming edges and slicing into narrow strips.
- Carefully drape each dough strip around a prepared clothespin, ensuring a slight overlap. Position on parchment-lined baking sheet with ends facing downward. Repeat with remaining dough.
- Bake for 18-20 minutes until achieving a delicate golden-brown color.
- Allow cookies to rest 2-3 minutes, then gently extract clothespins. Complete cooling on a wire rack.
- Create filling by combining flour, sugar, and milk in a pan. Cook over medium heat, continuously whisking until thickened (approximately 10 minutes).
- Remove from heat, transfer to a heatproof container. Cover with plastic wrap, ensuring direct contact to prevent skin formation. Refrigerate for 40 minutes.
- Using a stand mixer, whip room temperature butter for 8 minutes until exceptionally light and airy.
- Gradually incorporate the chilled flour mixture into the butter, one scoop at a time.
- Switch to paddle attachment, blend in vanilla and salt. Beat at medium-high speed for 10-13 minutes until achieving a smooth, fluffy consistency.
- Utilize a piping bag with a star tip to fill cooled cookie shells with the prepared cream.
Notes
- Precise dough temperature matters, so use a cold surface and chilled ingredients to prevent spreading during baking.
- Wrap clothespins completely in foil to prevent sticking and ensure easy cookie removal after baking.
- Use room temperature butter for the filling to guarantee smooth, creamy texture without lumps.
- Choose high-quality vanilla extract to enhance the overall flavor profile of the filling and cookies.
- Prep Time: 3 hours 20 minutes
- Cook Time: 20 minutes
- Category: Desserts, Snacks
- Method: Baking
- Cuisine: American
Nutrition
- Serving Size: 1
- Calories: 720 kcal
- Sugar: 2 g
- Sodium: 150 mg
- Fat: 80 g
- Saturated Fat: 50 g
- Unsaturated Fat: 30 g
- Trans Fat: 0.5 g
- Carbohydrates: 10 g
- Fiber: 0.5 g
- Protein: 3 g
- Cholesterol: 160 mg
Maya Thompson
Culinary Content Creator & Nutrition Enthusiast
Expertise
Healthy single-serving recipes, Meal prepping for individuals, Integrating nutrition into everyday cooking, Vegetarian and plant-based cuisine
Education
The Chef’s Academy at Harrison College
Associate of Applied Science in Culinary Arts
Focus: Nutrition, meal planning, and culinary techniques for healthy living.
Maya found her passion in the kitchen by mixing good food with good energy. After earning her culinary degree at The Chef’s Academy at Harrison College, she made it her mission to keep cooking simple, wholesome, and packed with flavor.
At Steelhead Diner, Maya shares easy, healthy recipes built for real life. For Maya, great food seems like a celebration of everyday moments, made better one fresh bite at a time.