
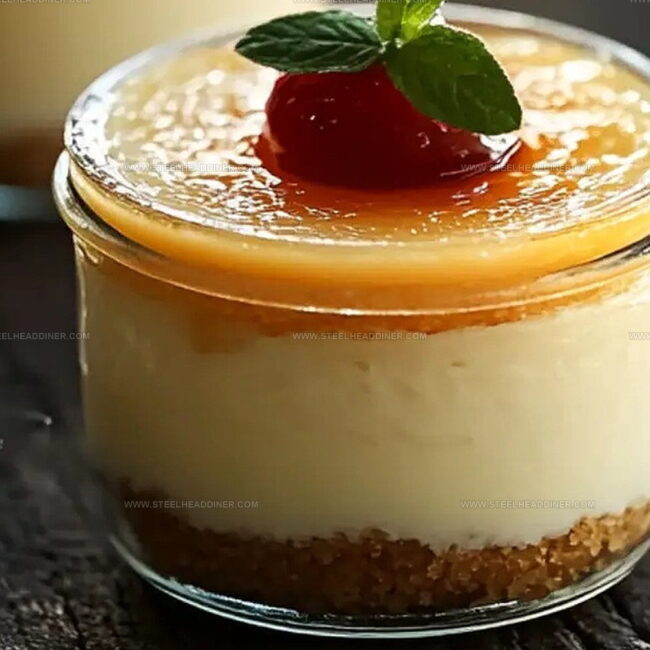
The Cutest Mini Sweetened Condensed Milk Cheesecake Jars Recipe
Creamy and decadent, these mini sweetened condensed milk cheesecake jars will steal your heart with their irresistible charm.
Layered with velvety smooth filling and a buttery graham cracker base, the recipe brings pure dessert magic to your table.
Each spoonful promises a rich, tangy burst of flavor that melts effortlessly on your tongue.
The compact jars make portion control a breeze and add a touch of adorable elegance to any gathering.
Silky cream cheese blends perfectly with sweetened condensed milk, creating a luxurious texture that feels both indulgent and light.
These individual cheesecake jars offer a delightful twist on the classic dessert, ensuring every bite is pure bliss.
Prepare to fall in love with this simple yet stunning treat that’ll have everyone asking for seconds.
Why Mini Condensed Milk Cheesecake Jars Shine
Ingredients Needed For Mini Cheesecake Jars
Base Ingredients:Cheesecake Filling Ingredients:Topping Ingredients:Step-By-Step Mini Cheesecake Jar Preparation

Step 1: Create Buttery Crust
Grab a medium bowl and combine graham cracker crumbs with melted butter. Mix thoroughly until the crumbs stick together perfectly.
Gently press the mixture into the bottom of each jar, creating a solid foundation for your cheesecake.
Step 2: Whip Up Creamy Filling
In a large mixing bowl, beat cream cheese until it becomes silky smooth.
Add these ingredients:Blend everything until well combined. Gently fold in whipped cream to create a light, airy texture that’s irresistibly soft.
Step 3: Layer with Love
Carefully spoon the dreamy cheesecake filling over the graham cracker crust in each jar. Use a spatula to smooth the top, creating a picture-perfect surface.
Step 4: Chill and Set
Cover the jars with lids or plastic wrap. Refrigerate for at least 3-4 hours, or ideally overnight.
This resting time allows the flavors to meld and the texture to become wonderfully firm.
Step 5: Dress and Impress
Just before serving, add your favorite toppings.
Consider:Each jar becomes a personalized dessert that’s sure to delight!
Smart Tips For Mini Sweetened Condensed Milk Cheesecakes
Creative Takes On Mini Cheesecake Jars
Great Foods To Pair With Mini Cheesecake Jars
Storing Mini Cheesecake Jars For Freshness
FAQs
Absolutely! These mini cheesecake jars can be prepared 2-3 days in advance and stored in the refrigerator. Just keep them covered until you’re ready to serve.
No special equipment is needed. Just use clean mason jars or small dessert glasses you have at home. Standard kitchen tools like a mixing bowl and spatula work perfectly.
You can use low-fat cream cheese and reduced-fat sweetened condensed milk. However, the texture might be slightly less creamy compared to the full-fat version. The taste will still be delicious.
Print
Mini Sweetened Condensed Milk Cheesecake Jars Recipe
- Total Time: 20 minutes
- Yield: 8 1x
Description
Creamy mini sweetened condensed milk cheesecake jars bring dessert magic to your table with minimal effort. Layers of rich, silky goodness invite sweet indulgence, promising delightful spoonfuls of pure bliss that you’ll savor to the last bite.
Ingredients
Cheesecake Filling
- 24 ounces (680 grams) cream cheese, softened
- 14 ounces (397 grams) sweetened condensed milk
- 4 large eggs
- 2 teaspoons vanilla extract
- 1/4 teaspoon lemon extract
Crust
- 1 1/2 cups (180 grams) graham cracker crumbs
- 1/3 cup (76 grams) butter, melted
Strawberry Sauce
- 16 ounces (454 grams) strawberries
- 1/2 cup (100 grams) granulated sugar
- 3 tablespoons (24 grams) cornstarch
- 1/2 cup (120 milliliters) water
- 1 tablespoon (15 milliliters) lemon juice
Instructions
- Create a robust base by mixing graham cracker crumbs with melted butter until the texture becomes cohesive and moldable.
- Gently press the crumb mixture into the bottom of each jar, forming a compact and even foundation for the cheesecake.
- Using an electric mixer, whip the cream cheese until it reaches a silky, lump-free consistency at room temperature.
- Incorporate sweetened condensed milk, vanilla extract, and lemon juice into the cream cheese, blending until the mixture becomes smooth and uniform.
- Carefully fold whipped cream into the cheese mixture, creating a light and airy filling with gentle, sweeping motions.
- Delicately spoon the creamy filling over the graham cracker crust in each jar, ensuring an even distribution and a neat surface.
- Seal the jars with lids or plastic wrap and refrigerate for 3-4 hours, or ideally overnight, allowing the cheesecake to set and flavors to meld.
- Just before serving, embellish with optional garnishes like fresh berries, caramel drizzle, chocolate sauce, or crushed nuts to enhance visual appeal and taste.
Notes
- Use room temperature cream cheese to ensure a smooth, lump-free filling that blends effortlessly.
- Crush graham crackers finely for a more compact and sturdy crust that holds together perfectly.
- Whip cream separately until stiff peaks form for an extra light and airy cheesecake texture.
- Refrigerate jars for at least 4 hours to allow flavors to meld and achieve the ideal creamy consistency.
- Swap graham crackers with gluten-free cookies for a celiac-friendly version.
- Add fresh lemon zest for an extra bright, tangy flavor profile that complements the sweet filling.
- Try different toppings like crushed Oreos, fruit compote, or chocolate shavings for variety.
- Prep Time: 20 minutes
- Cook Time: 0 minutes
- Category: Desserts
- Method: Chilling
- Cuisine: American
Nutrition
- Serving Size: 8
- Calories: 474 kcal
- Sugar: 38 g
- Sodium: 242 mg
- Fat: 30 g
- Saturated Fat: 18 g
- Unsaturated Fat: 11 g
- Trans Fat: 0.5 g
- Carbohydrates: 39 g
- Fiber: 1 g
- Protein: 9 g
- Cholesterol: 115 mg
Maya Thompson
Culinary Content Creator & Nutrition Enthusiast
Expertise
Healthy single-serving recipes, Meal prepping for individuals, Integrating nutrition into everyday cooking, Vegetarian and plant-based cuisine
Education
The Chef’s Academy at Harrison College
Associate of Applied Science in Culinary Arts
Focus: Nutrition, meal planning, and culinary techniques for healthy living.
Maya found her passion in the kitchen by mixing good food with good energy. After earning her culinary degree at The Chef’s Academy at Harrison College, she made it her mission to keep cooking simple, wholesome, and packed with flavor.
At Steelhead Diner, Maya shares easy, healthy recipes built for real life. For Maya, great food seems like a celebration of everyday moments, made better one fresh bite at a time.