
The Dreamiest Cherry Cheesecake Tacos Recipe You’ll Ever Try
Sweet meets savory in these delightful cherry cheesecake tacos that blend creamy indulgence with playful texture.
Crisp tortilla shells cradle a luscious filling that dances between classic dessert and innovative culinary creation.
Dessert lovers will adore how these tacos challenge traditional expectations with their unexpected twist.
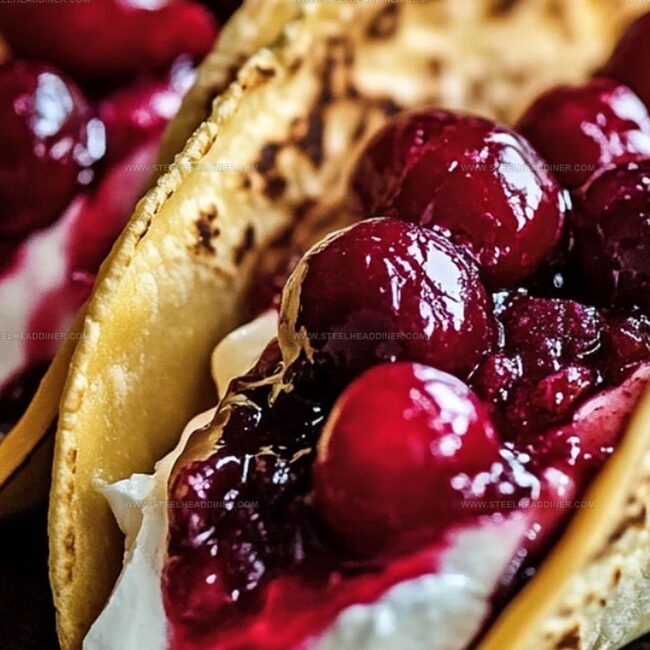
Soft cream cheese mingles with vibrant cherry compote, creating a harmonious blend of flavors.
Each bite promises a delectable journey through creamy, fruity, and crunchy sensations.
The combination of delicate sweetness and crisp shell offers a memorable dessert experience that will impress everyone at the table.
Prepare to elevate your dessert game with this irresistible treat that promises to become an instant favorite.
Reasons To Love Cherry Cheesecake Tacos
Ingredients For Cherry Cheesecake Taco
Taco Shells:Cinnamon Sugar Coating:Cheesecake Filling:Topping:Step-By-Step Instructions For Cheesecake Tacos
Step 1: Create Cinnamon Sugar Coating
Mix granulated sugar and ground cinnamon in a wide, shallow bowl. Ensure the ingredients are thoroughly combined to create a sweet and fragrant coating for the taco shells.
Step 2: Whip Cheesecake Filling
In a large mixing bowl, blend together:Beat until the mixture becomes smooth and creamy. In a separate bowl, whip heavy cream until stiff peaks form.
Gently fold the whipped cream into the cream cheese mixture, creating a light and fluffy filling. Transfer the filling to a piping bag and refrigerate to keep cool.
Step 3: Fry Taco Shells
Heat vegetable oil in a large skillet over medium heat. Using tongs, carefully fold each tortilla in half, creating a taco shell shape.
Fry each shell until golden brown and crispy, about 1-2 minutes per side. Immediately after frying, roll the hot shell in the cinnamon sugar mixture, ensuring complete coverage.
Place on a wire rack to cool and maintain crispiness.
Step 4: Assemble Delightful Dessert Tacos
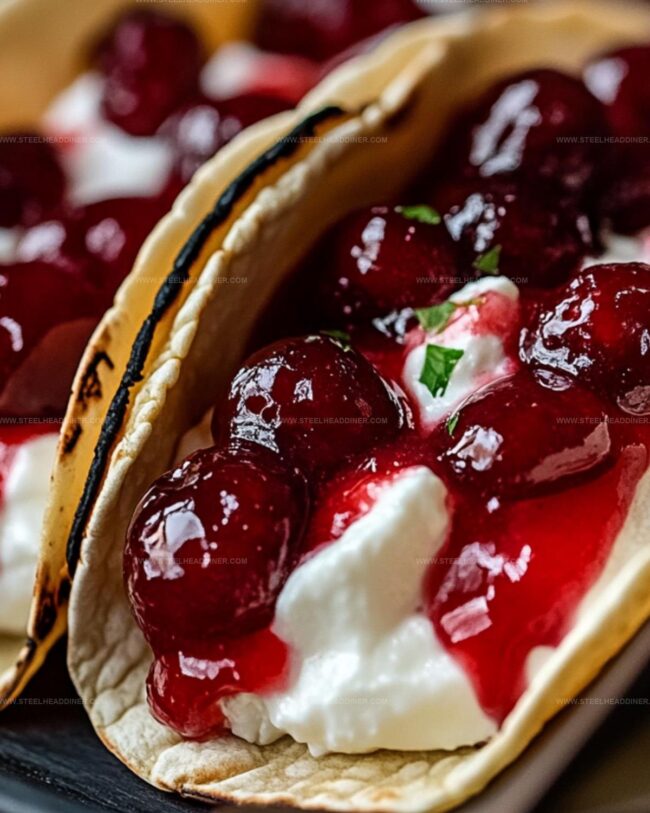
Pipe the chilled cheesecake filling into each crispy cinnamon sugar taco shell.
Top generously with cherry pie filling, allowing the vibrant red cherries to peek out invitingly.
Step 5: Serve and Enjoy
Serve the cherry cheesecake tacos immediately.
The contrast of crispy shell, creamy filling, and sweet cherry topping creates a delightful dessert experience that will impress everyone at the table.
Helpful Tips To Nail Cheesecake Taco

Different Twists To Try On Cheesecake Tacos
Pairing Options To Enjoy With Cheesecake Tacos
Tips To Store Cherry Cheesecake Tacos Fresh
FAQs
Pat the tortillas dry before frying and let them cool completely on a wire rack to maintain crispiness. Fry just before serving to keep the shells crunchy.
Yes, you can prepare the filling up to 2 days in advance and store it in the refrigerator in a sealed piping bag or container.
Use small corn or flour tortillas, preferably those with a smaller diameter around 6 inches, for the perfect taco size and crisp texture.
Serve on individual plates, use a fork, or have napkins ready. The filling might drip, so eating carefully is key to enjoying these sweet tacos.
Print
Cherry Cheesecake Tacos Recipe
- Total Time: 35 minutes
- Yield: 8 1x
Description
Indulgent cherry cheesecake tacos blend Mexican street food flair with classic dessert charm. Sweet shells cradle creamy filling and luscious cherry compote, creating a delightful fusion that promises pure culinary joy for you.
Ingredients
Main Ingredients:
- 8 small flour tortillas
- 1 can cherry pie filling
- 8 ounces (226 grams) cream cheese, softened
Coating and Flavor Enhancers:
- 1 cup granulated sugar
- 1 tablespoon cinnamon
- Oil for frying
Filling and Topping:
- 1 cup heavy whipping cream
- 1 cup powdered sugar
- 1 teaspoon vanilla extract
Instructions
- Combine granulated sugar and cinnamon in a mixing vessel, creating a fragrant coating mixture for the taco shells.
- Whisk cream cheese with powdered sugar and vanilla extract until velvety smooth in texture.
- Separately whip heavy cream to stiff, billowy peaks using an electric mixer.
- Gently incorporate whipped cream into the cream cheese mixture, maintaining a light, airy consistency.
- Transfer the cheesecake filling into a piping bag and chill in the refrigerator to firm up.
- Heat oil in a skillet to medium temperature (around 350°F), ensuring even cooking.
- Using kitchen tongs, carefully fold each tortilla into a taco shape and fry until achieving a golden, crispy exterior, approximately 1-2 minutes per side.
- Immediately after frying, roll the hot taco shells in the prepared cinnamon-sugar mixture, ensuring complete coverage.
- Allow the coated shells to cool and crisp up on a wire rack.
- Fill each crisp taco shell with the chilled cheesecake mixture using the piping bag.
- Crown each taco with a generous spoonful of cherry pie filling.
- Serve immediately to preserve the delightful crunch and maximize flavor contrast.
Notes
- Customize the tortilla thickness for a crunchier or softer taco shell experience, depending on personal preference.
- Use room temperature cream cheese to ensure a smoother, lump-free filling that blends seamlessly.
- Consider alternative fruit toppings like blueberry or strawberry compote for variety and seasonal twists.
- Drain excess oil on paper towels after frying to maintain a crisp texture without greasiness.
- Prep Time: 25 minutes
- Cook Time: 10 minutes
- Category: Desserts, Snacks
- Method: Frying
- Cuisine: American
Nutrition
- Serving Size: 8
- Calories: 418 kcal
- Sugar: 35 g
- Sodium: 240 mg
- Fat: 26 g
- Saturated Fat: 15 g
- Unsaturated Fat: 9 g
- Trans Fat: 0.5 g
- Carbohydrates: 38 g
- Fiber: 1 g
- Protein: 5 g
- Cholesterol: 70 mg
Maya Thompson
Culinary Content Creator & Nutrition Enthusiast
Expertise
Healthy single-serving recipes, Meal prepping for individuals, Integrating nutrition into everyday cooking, Vegetarian and plant-based cuisine
Education
The Chef’s Academy at Harrison College
Associate of Applied Science in Culinary Arts
Focus: Nutrition, meal planning, and culinary techniques for healthy living.
Maya found her passion in the kitchen by mixing good food with good energy. After earning her culinary degree at The Chef’s Academy at Harrison College, she made it her mission to keep cooking simple, wholesome, and packed with flavor.
At Steelhead Diner, Maya shares easy, healthy recipes built for real life. For Maya, great food seems like a celebration of everyday moments, made better one fresh bite at a time.