
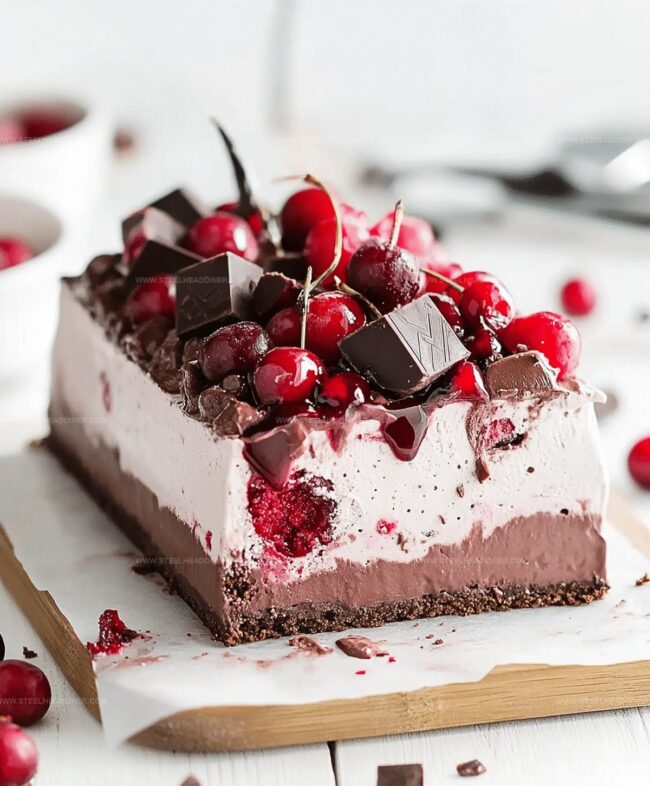
Dreamy Cherry Chocolate Ice Cream Cake Recipe for Dessert Lovers
Sweet dreams take shape with this decadent cherry chocolate ice cream cake that promises pure indulgence.
Layers of creamy richness meld perfectly with rich chocolate and bright cherry notes.
chocolate lovers will find themselves swooning over each delightful bite.
Chilled desserts rarely reach such magnificent heights of flavor complexity.
Cool kitchen magic happens when classic ingredients dance together in unexpected ways.
Summer celebrations demand something spectacular and memorable.
You’ll want to savor every luxurious spoonful of this dreamy creation.
Cherry Chocolate Ice Cream Cake: Why It’s Irresistible

Ingredients For Cherry Chocolate Ice Cream Cake
For the Base:For the Filling:For the Topping and Garnish:For the Preparation:Step-By-Step Directions For Cherry Chocolate Ice Cream Cake
Step 1: Prepare Cake Base
Line a cake pan with plastic wrap, ensuring it covers the bottom and sides completely. Carefully slice the chocolate cake horizontally into two equal layers using a long serrated knife.
Step 2: Create First Ice Cream Layer
Position one cake layer at the bottom of the prepared pan. Spread a smooth, even layer of softened cherry ice cream over the cake.
Generously scatter freshly chopped cherries across the ice cream surface.
Step 3: Add Top Cake Layer
Gently place the second cake layer on top of the ice cream.
Press down lightly to ensure the layers are compact and well-connected. Transfer the cake to the freezer and allow it to set for at least 4 hours.
Step 4: Craft Chocolate Ganache
Warm heavy cream in a saucepan until it reaches a gentle heat (avoid boiling). Remove from heat and pour over:Whisk the mixture continuously until it transforms into a glossy, smooth ganache.
Step 5: Finish With Ganache
Remove the cake from the freezer and carefully unwrap from the plastic. Pour the prepared chocolate ganache over the top, allowing it to cascade down the sides naturally.
Step 6: Add Final Touches
Optional: Sprinkle crushed chocolate cookies over the ganache for added crunch and visual appeal. Return the cake to the freezer for one additional hour to set completely before serving.
Expert Tips For Cherry Chocolate Ice Cream Cake
Flavor Alternatives For Cherry Chocolate Ice Cream Cake
Best Pairings For Cherry Chocolate Ice Cream Cake
Decadent Dessert Date Night Delight
Cozy Family Celebration Treat
Gourmet Entertaining Showstopper
Make-Ahead Dessert Magic
Storage Recommendations For Cherry Chocolate Ice Cream Cake
FAQs
A chocolate sponge cake or store-bought chocolate cake are perfect. They provide a sturdy base that complements the cherry ice cream and creates a delicious layered dessert.
Both work well. Fresh cherries give a brighter flavor, while frozen cherries are convenient and still provide great taste. Just ensure they’re pitted and chopped before adding to the ice cream layer.
Chop the chocolate into small, uniform pieces and use warm (not boiling) cream. Stir gently until the mixture is completely smooth and glossy, which helps create a perfect chocolate coating.
Print
Cherry Chocolate Ice Cream Cake Recipe
- Total Time: 30 minutes
- Yield: 8 1x
Description
Indulgent cherry chocolate ice cream cake brings together rich chocolate layers and sweet cherry notes for a delightful summer dessert. Cool, creamy textures and intense flavors make this treat irresistible to you.
Ingredients
- 2 cups (473 ml) cherry ice cream, softened
- 1 chocolate cake (store-bought or homemade)
- 1 cup (240 ml) fresh or canned cherries, chopped
- 1 cup (240 ml) heavy cream
- 1 cup (240 ml/170 g) dark chocolate, chopped
- 2 tbsps (30 ml) butter
- 1/2 cup (120 ml) crushed chocolate cookies (optional)
Instructions
- Carefully drape plastic wrap inside a cake pan, ensuring complete coverage of the bottom and sides.
- Using a serrated knife, precisely divide the chocolate cake into two uniform horizontal layers.
- Position the first cake layer at the base of the lined pan, creating a solid foundation for the dessert.
- Gently spread softened cherry ice cream across the cake layer, ensuring even distribution and complete coverage.
- Generously scatter freshly chopped cherries over the ice cream layer, creating delightful pockets of fruity flavor.
- Delicately place the second cake layer atop the ice cream, applying gentle pressure to secure the layers.
- Transfer the assembled cake to the freezer and allow to solidify for a minimum of 4 hours, ensuring complete structural integrity.
- In a medium saucepan, warm heavy cream until it reaches a gentle simmer (approximately 180°F), avoiding full boiling.
- Pour the heated cream over finely chopped chocolate and butter, allowing the ingredients to meld together.
- Whisk the mixture continuously until achieving a smooth, glossy chocolate ganache with no visible lumps.
- Carefully remove the cake from the freezer and unwrap from the plastic film.
- Elegantly cascade the prepared chocolate ganache over the cake’s surface, allowing it to drape naturally.
- Optional: Sprinkle crushed chocolate cookies around the edges for added textural complexity.
- Return the cake to the freezer for an additional hour to set the ganache and enhance flavor melding.
Notes
- Always use room temperature ingredients to ensure smooth mixing and better incorporation of flavors.
- Choose high-quality chocolate and fresh cherries for the most intense and authentic taste experience.
- For a gluten-free version, swap the chocolate cake layer with a flourless chocolate base or almond flour cake.
- Create make-ahead magic by preparing this dessert up to a week in advance, storing tightly wrapped in the freezer for maximum convenience.
- Prep Time: 30 minutes
- Cook Time: 0 minutes
- Category: Desserts
- Method: Freezing
- Cuisine: American
Nutrition
- Serving Size: 8
- Calories: 370 kcal
- Sugar: 28 g
- Sodium: 150 mg
- Fat: 24 g
- Saturated Fat: 14 g
- Unsaturated Fat: 8 g
- Trans Fat: 0.5 g
- Carbohydrates: 38 g
- Fiber: 3 g
- Protein: 4 g
- Cholesterol: 70 mg
Maya Thompson
Culinary Content Creator & Nutrition Enthusiast
Expertise
Healthy single-serving recipes, Meal prepping for individuals, Integrating nutrition into everyday cooking, Vegetarian and plant-based cuisine
Education
The Chef’s Academy at Harrison College
Associate of Applied Science in Culinary Arts
Focus: Nutrition, meal planning, and culinary techniques for healthy living.
Maya found her passion in the kitchen by mixing good food with good energy. After earning her culinary degree at The Chef’s Academy at Harrison College, she made it her mission to keep cooking simple, wholesome, and packed with flavor.
At Steelhead Diner, Maya shares easy, healthy recipes built for real life. For Maya, great food seems like a celebration of everyday moments, made better one fresh bite at a time.