
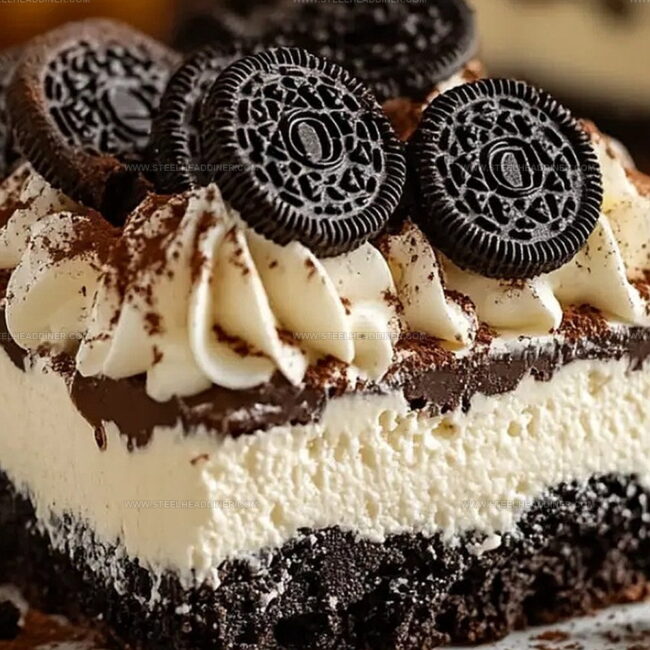
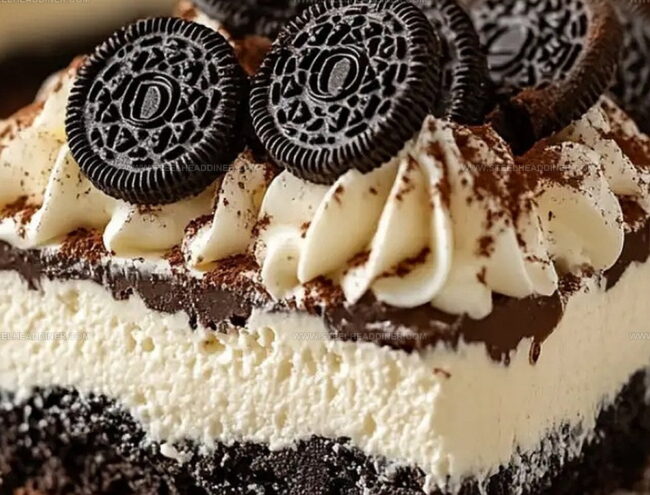
The Most Indulgent No Bake Oreo Dessert Recipe Ever Made
Creamy, dreamy, and utterly irresistible, this no bake Oreo dessert will make your taste buds dance with joy.
Oreos bring magic to every sweet craving, creating a dessert that’s both simple and spectacular.
Layers of crushed cookies and smooth cream come together in a delightful symphony of flavors.
Each spoonful promises pure indulgence without the hassle of turning on the oven.
Chocolate lovers will swoon over the rich, decadent texture that melts in your mouth.
The best part?
This dessert requires minimal effort but delivers maximum satisfaction.
Prepare to fall in love with a treat that’s sure to become your new favorite no-bake sensation.
No-Bake Oreo Dessert That’s Effortless and Delicious
Ingredients for No-Bake Oreo Dessert
Base Ingredients:Dairy Components:Flavor and Thickening Ingredients:How to Prepare No-Bake Oreo Dessert

Step 1: Crush Oreo Cookies
Break Oreo cookies into fine crumbs using a food processor or place cookies in a sealed plastic bag and crush with a rolling pin. The goal is to create a uniform, sandy texture that will form the perfect base for your dessert.
Step 2: Create Cookie Crust
Mix cookie crumbs with melted butter until completely combined. Press the mixture firmly into the bottom of a rectangular baking dish, creating an even layer.
Use the back of a spoon or flat measuring cup to compact the crust smoothly.
Step 3: Prepare Cream Cheese Layer
Whip cream cheese and powdered sugar together using an electric mixer until silky and smooth.
Gently fold in whipped topping to create a light, airy texture. Carefully spread this creamy mixture over the chilled cookie crust.
Step 4: Make Pudding Layer
Whisk pudding mix with cold milk until completely blended. Allow mixture to thicken for a few minutes.
Fold in chopped Oreo cookies, creating a delightful cookies and cream effect. Spread evenly over the cream cheese layer.
Step 5: Add Topping
Cover the pudding layer with remaining whipped topping, creating a smooth, even surface. Sprinkle additional crushed Oreo cookies on top for extra crunch and visual appeal.
Step 6: Chill and Serve
Refrigerate the dessert for at least 2 hours to allow layers to set and flavors to meld. Before serving, you can garnish with extra Oreo crumbs for a stunning presentation.
Pro Tips for No-Bake Oreo Dessert
Variations on No-Bake Oreo Dessert
Pairing Ideas for No-Bake Oreo Dessert
How to Keep No-Bake Oreo Dessert Fresh
FAQs
Yes, you can substitute homemade whipped cream. Just ensure it’s stabilized and whipped to stiff peaks for the best texture.
Absolutely! You can prepare this dessert up to 2 days in advance. Keep it covered in the refrigerator until you’re ready to serve.
No worries! You can use a rolling pin, the bottom of a heavy skillet, or pulse the cookies in a food processor to create fine crumbs.
Print
No Bake Oreo Dessert Recipe
- Total Time: 30 minutes
- Yield: 12 1x
Description
Creamy No Bake Oreo Dessert brings indulgent chocolate magic to your table with minimal effort. Cool layers of crushed cookies and silky cream create a delightful treat you’ll crave again and again.
Ingredients
Oreo Base:
- 32 Oreo cookies
- 6 tablespoons (90 milliliters) unsalted butter, melted
Cream and Pudding Mixture:
- 8 ounces (226 grams) cream cheese, softened
- 1 cup (120 grams) powdered sugar
- 2 (3 ounces/85 grams) boxes instant chocolate pudding mix
- 3 cups (720 milliliters) cold milk
- 8-ounce (226 grams) container whipped topping
Topping:
- 10–12 Oreo cookies, crushed into small pieces
- Additional Oreo cookies, crushed, for garnish
Instructions
- Pulverize Oreo cookies into fine crumbs using a food processor or sealed bag with a rolling pin, ensuring uniform texture.
- Blend cookie crumbs with melted butter until thoroughly incorporated, creating a cohesive base mixture.
- Transfer the crumb mixture into a prepared 9×13 inch pan, firmly pressing to create an even, compact crust layer.
- Chill the crust in the refrigerator while preparing subsequent layers.
- Whip cream cheese with powdered sugar using an electric mixer until achieving a silky, lump-free consistency.
- Gently incorporate whipped topping into the cream cheese mixture, folding carefully to maintain airiness.
- Spread the cream cheese mixture evenly over the chilled crust, creating a smooth second layer.
- Combine instant pudding mix with cold milk, whisking until fully dissolved and beginning to thicken.
- Fold chopped Oreo cookies into the pudding mixture, allowing it to set for 2-3 minutes.
- Distribute the pudding and cookie layer atop the cream cheese layer, ensuring complete coverage.
- Top the dessert with remaining whipped topping, creating an elegant final layer.
- Refrigerate for a minimum of 2 hours to allow complete setting and flavor melding.
- Optional: Garnish with additional crushed Oreo cookies before serving for extra crunch and visual appeal.
Notes
- Crushing Oreos can be done efficiently by using a food processor for consistent, fine crumbs that create a smoother crust texture.
- Ensure cream cheese is at room temperature to prevent lumps and achieve a silky, smooth filling layer when mixing.
- For a gluten-free version, substitute regular Oreos with gluten-free chocolate sandwich cookies and use gluten-free pudding mix.
- Chilling the dessert for longer than 2 hours helps develop deeper flavor and allows layers to set more firmly, making slicing easier.
- Prep Time: 30 minutes
- Cook Time: 0 minutes
- Category: Desserts, Snacks
- Method: Refrigerating
- Cuisine: American
Nutrition
- Serving Size: 12
- Calories: 298
- Sugar: 26 g
- Sodium: 157 mg
- Fat: 16 g
- Saturated Fat: 9 g
- Unsaturated Fat: 6 g
- Trans Fat: 0.3 g
- Carbohydrates: 34 g
- Fiber: 1.5 g
- Protein: 4 g
- Cholesterol: 35 mg
Maya Thompson
Culinary Content Creator & Nutrition Enthusiast
Expertise
Healthy single-serving recipes, Meal prepping for individuals, Integrating nutrition into everyday cooking, Vegetarian and plant-based cuisine
Education
The Chef’s Academy at Harrison College
Associate of Applied Science in Culinary Arts
Focus: Nutrition, meal planning, and culinary techniques for healthy living.
Maya found her passion in the kitchen by mixing good food with good energy. After earning her culinary degree at The Chef’s Academy at Harrison College, she made it her mission to keep cooking simple, wholesome, and packed with flavor.
At Steelhead Diner, Maya shares easy, healthy recipes built for real life. For Maya, great food seems like a celebration of everyday moments, made better one fresh bite at a time.